Battery switch on travel trailer function is crucial for safe and efficient RV operation. Understanding how to use your battery switch correctly prevents accidental discharges, protects your appliances, and extends the life of your batteries. This guide will walk you through the different types of switches, their operation, and essential safety precautions.
We’ll cover everything from connecting and disconnecting your house and chassis batteries to troubleshooting common problems. We’ll also delve into the integration of the battery switch with other electrical systems in your travel trailer, like solar panels and converters, so you can confidently manage your RV’s power.
Understanding Battery Switch Functionality in Travel Trailers
Your travel trailer’s battery switch is a crucial component for managing power and protecting your batteries. It allows you to disconnect your house batteries from the trailer’s electrical system, preventing unwanted drain and potential damage. Understanding how it works is key to maintaining your RV’s power system and preventing costly repairs.
Battery Switch Purposes
The primary purpose of a battery switch is to control the flow of power to and from your travel trailer’s house batteries. This allows you to disconnect the batteries completely, preventing parasitic drain (slow battery discharge from devices even when the trailer is off), and also to selectively use either your deep-cycle house batteries or your starting battery (usually for the tow vehicle) or both simultaneously.
This is especially important during extended periods of storage to prevent a completely drained battery.
Types of Battery Switches
Several types of battery switches exist, each with its own functionality. The most common types are the 1-2-Both switch and the disconnect switch.
- 1-2-Both Switch: This switch offers three positions: “1” (connects only the starting battery), “2” (connects only the house battery), and “Both” (connects both batteries). This provides flexibility in power management, allowing you to use either battery independently or both together.
- Disconnect Switch: This switch simply connects or disconnects the house batteries from the trailer’s electrical system. It’s a simpler option than the 1-2-Both switch, providing only an “on” and “off” position. This is often used for simple battery disconnection during storage.
Other less common switches include those with multiple battery banks and more complex configurations, particularly in larger RVs or those with solar panels or generators integrated into their power systems.
Operating a Typical Battery Switch
Operating a 1-2-Both switch is straightforward. First, locate the switch, usually near the battery compartment or inside a convenient access panel. The switch will have clearly marked positions: “1,” “2,” and “Both.”
Okay, so you’re dealing with your travel trailer’s battery, right? Knowing how to use the battery switch is crucial. Check out this helpful guide on the battery switch on travel trailer function to understand the basics. Then, if you’re looking for more in-depth info on managing power, this other resource on battery switch on travel trailer function might be useful; it often covers more advanced techniques and troubleshooting.
Basically, understanding your battery switch is key to preventing dead batteries and keeping your trailer running smoothly.
- To use only the starting battery: Turn the switch to the “1” position. This is generally used for powering the tow vehicle’s starting system, not the trailer’s systems.
- To use only the house battery: Turn the switch to the “2” position. This powers the appliances and systems within your travel trailer.
- To use both batteries: Turn the switch to the “Both” position. This is typically used when you need maximum power, such as when running multiple appliances simultaneously.
- To completely disconnect the batteries: For the 1-2-Both switch, there is usually an “off” position that fully disconnects both batteries. For a disconnect switch, simply turn it to the “off” position.
Remember to always consult your RV’s owner’s manual for specific instructions on operating your battery switch.
Advantages and Disadvantages of Battery Switch Types
| Feature | 1-2-Both Switch | Disconnect Switch |
|---|---|---|
| Flexibility | High: Allows independent use of starting and house batteries, or both. | Low: Only on/off functionality. |
| Complexity | Higher: More moving parts, slightly more prone to failure. | Lower: Simple design, less prone to failure. |
| Cost | Generally higher initial cost. | Generally lower initial cost. |
| Maintenance | May require more periodic checks and maintenance. | Less maintenance required. |
Remember that using the correct switch position is crucial for preventing accidental discharge or damage to your batteries. Always double-check the position before leaving your RV unattended for extended periods.
Connecting and Disconnecting Batteries: Battery Switch On Travel Trailer Function
Connecting and disconnecting your travel trailer’s batteries involves using a battery switch, a crucial component for managing power flow and preventing accidental discharges. Understanding this process is essential for safe and efficient RV operation. Properly connecting and disconnecting your batteries safeguards your equipment and ensures a smooth camping experience.Properly connecting and disconnecting your batteries is a straightforward process once you understand the steps involved and the necessary safety precautions.
This section will detail the procedures for both house and chassis batteries, along with important safety guidelines.
Battery Switch Operation
Most RV battery switches are designed with a series of positions, typically “Off,” “Battery 1,” “Battery 2,” and “Both.” “Off” completely disconnects both batteries from the system, preventing discharge. “Battery 1” connects only the house battery (usually larger) to the trailer’s electrical system, while “Battery 2” connects only the chassis battery (usually smaller, dedicated to starting the vehicle’s engine) to the system.
“Both” connects both batteries in parallel, providing greater power capacity. Always consult your specific battery switch’s instructions for exact operation, as some models may vary slightly. To connect, simply turn the switch to the desired position. To disconnect, switch to the “Off” position.
Safety Precautions When Working with RV Batteries
Working with RV batteries requires caution due to the potential hazards associated with lead-acid batteries. Always wear safety glasses or goggles to protect your eyes from splashing acid or sparks. Batteries produce hydrogen gas, which is highly flammable and explosive. Ensure adequate ventilation around the batteries – work outdoors or in a well-ventilated area. Never allow open flames or sparks near batteries.
Wear gloves to protect your hands from acid burns. If acid does contact your skin, immediately flush the area with plenty of water and seek medical attention if necessary. Before working on any battery system, disconnect the negative terminal first to prevent accidental short circuits.
Identifying Positive and Negative Battery Terminals
Identifying positive and negative terminals is crucial to avoid accidental short circuits and damage to your RV’s electrical system. The positive terminal is usually marked with a “+” symbol, often a larger red colored terminal post or cable. The negative terminal is marked with a “-” symbol, and often a smaller black colored terminal post or cable. Always double-check the markings before connecting or disconnecting any cables.
If the markings are unclear, consult your battery’s documentation or a qualified technician.
Troubleshooting Battery Switch Issues
If you’re experiencing problems with your battery switch, such as no power to appliances, several troubleshooting steps can help identify the issue.
- Check the battery switch position: Ensure the switch is in the correct position (“Both” for combined power, “Battery 1” or “Battery 2” for individual battery use).
- Inspect the battery connections: Look for corrosion or loose connections on both the battery terminals and the wires connected to the switch. Clean any corrosion with a wire brush and reconnect securely.
- Test the batteries: Use a multimeter to check the voltage of each battery. A low voltage reading indicates a discharged or faulty battery.
- Check fuses and circuit breakers: Inspect the fuses and circuit breakers in your RV’s electrical panel. A blown fuse or tripped breaker could interrupt power to appliances.
- Inspect the wiring: Look for any visible damage to the wiring between the batteries and the switch, or between the switch and the electrical panel.
- Consult a professional: If you cannot identify the problem after these steps, consult a qualified RV technician or electrician.
Battery Switch and Electrical System Integration

Understanding how your battery switch interacts with the rest of your travel trailer’s electrical system is crucial for safe and reliable power. This section details the connections, potential problems, and troubleshooting steps related to your battery switch.
Okay, so you’re dealing with your travel trailer’s battery, right? Understanding the battery switch on travel trailer function is key to avoiding dead batteries. It’s basically a master switch, letting you disconnect your house batteries from the trailer’s electrical system. This prevents drain when you’re not using the trailer. Another good resource to check out is battery switch on travel trailer function for more detailed explanations and troubleshooting tips.
Knowing how to use this switch properly will save you headaches down the road!
The battery switch acts as the central control point for your trailer’s 12-volt DC power. It manages the flow of electricity from your batteries to various components, allowing you to selectively use either your house batteries, your tow vehicle’s battery, or both. Proper understanding of its function and integration is key to avoiding electrical issues and ensuring your trailer’s systems operate correctly.
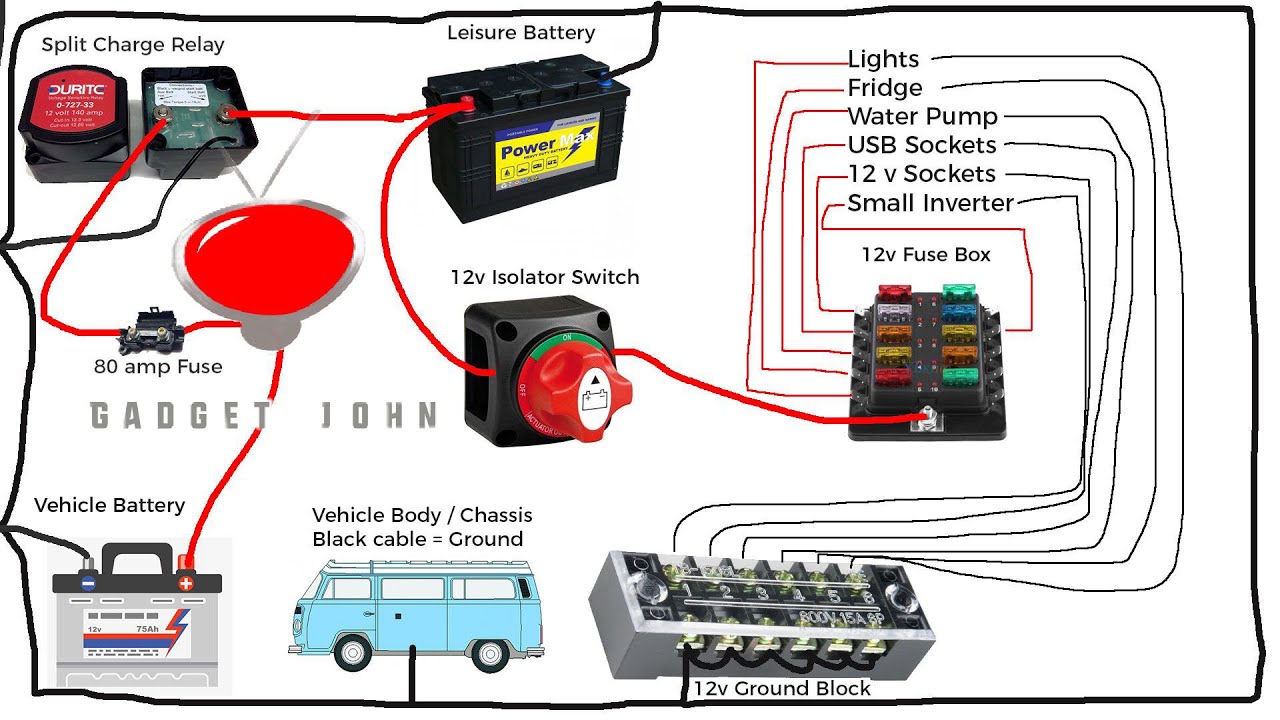
Battery Switch System Diagram
The following table illustrates a simplified diagram of how the battery switch integrates with the major electrical components in a typical travel trailer.
| Component | Connection | Description |
|---|---|---|
| Battery 1 (House Battery) | Connected to Battery Switch | Provides power for trailer appliances and systems. |
| Battery 2 (House Battery) | Connected to Battery Switch | Provides additional power for trailer appliances and systems (often in parallel with Battery 1). |
| Battery Switch | Connects to Batteries and Converter | Controls the flow of power from the batteries to the rest of the system. Positions typically include “Off,” “Battery 1,” “Battery 2,” and “Both.” |
| Converter | Connected to Battery Switch and AC Power | Converts 120V AC power from shore power or a generator to 12V DC power for charging the batteries and powering some appliances. |
| Solar Panel(s) | Connected to Charge Controller, then to Batteries | Provides supplemental power to charge the batteries. A charge controller regulates the flow of power from the solar panels to the batteries. |
| 12V Appliances (Lights, Water Pump, etc.) | Connected to Battery Switch (via fuses and wiring) | Draw power directly from the selected battery(ies) via the switch. |
Battery Switch Interaction with Other Electrical Systems
The battery switch is the heart of the DC power system, influencing how other components operate. For example, when the switch is in the “Both” position, both house batteries provide power to the appliances. If the switch is in the “Off” position, all power from the house batteries to the appliances is cut, preventing accidental discharge. The converter will typically charge the batteries regardless of the battery switch position (unless it’s also turned off), using either shore power or generator power.
Solar panels, independently of the battery switch, charge the batteries through the charge controller, which protects the batteries from overcharging.
Potential Problems from Improper Battery Switch Usage, Battery switch on travel trailer function
Incorrect use of the battery switch can lead to several issues. Leaving the switch in the “Both” position when not using the trailer can lead to rapid battery discharge. This is because parasitic draws from things like clocks and alarm systems will drain both batteries. Conversely, leaving the switch in the “Off” position while trying to use trailer appliances will obviously prevent them from functioning.
Improper switching can also damage the battery switch itself or other components due to voltage spikes or shorts.
Potential Causes of Battery Switch Failure and Diagnostic Methods
Battery switch failure is usually caused by corrosion, loose connections, or internal component damage. Troubleshooting involves visually inspecting the switch and its connections for corrosion, loose wires, or damage. A multimeter can be used to check for voltage at various points in the circuit to pinpoint where the problem lies. If the switch itself is faulty, it will need to be replaced.
Always disconnect the batteries before working on any part of the electrical system.
- Corrosion: Clean terminals and connections with a wire brush and baking soda solution.
- Loose Connections: Tighten all wire connections securely.
- Internal Switch Failure: Replace the battery switch.
- Blown Fuse: Check and replace any blown fuses in the circuit.
Maintenance and Troubleshooting
Keeping your travel trailer’s battery switch in top shape is crucial for reliable power. Regular maintenance prevents problems and extends the lifespan of your batteries and electrical system. Neglecting this can lead to frustrating breakdowns far from home. This section Artikels a maintenance schedule and troubleshooting steps to keep you powered up on the road.
Regular Maintenance Schedule
A proactive approach to maintenance will save you headaches down the road. This schedule Artikels recommended checks and cleaning for your battery switch and related components. Remember to always disconnect the negative battery terminal before performing any maintenance on the electrical system.
- Monthly Inspection: Visually inspect the battery switch for any signs of corrosion, loose connections, or damage. Check the battery terminals for corrosion buildup and clean them as needed (see below). Ensure the switch operates smoothly.
- Semi-Annual Cleaning: Thoroughly clean the battery switch and its surrounding area using a wire brush and a battery terminal cleaner. Pay close attention to removing any corrosion from the switch itself and the connecting wires.
- Annual Check and Tightening: Check all connections to the battery switch for tightness. Use a wrench to tighten any loose bolts or nuts. This ensures a secure electrical connection, preventing voltage drops and potential problems.
Cleaning Battery Terminals and Connections
Corrosion on battery terminals is a common problem that can impede current flow and damage your batteries. Cleaning them regularly is essential.
- Gather Supplies: You’ll need a wire brush (preferably a brass one), baking soda, water, a spray bottle, and protective gloves.
- Disconnect Batteries: Always disconnect the negative (-) terminal first, then the positive (+) terminal. This prevents accidental shorts.
- Clean Terminals: Use the wire brush to remove any corrosion from the battery terminals and the battery switch connections. Scrub vigorously until the metal is clean and shiny.
- Baking Soda Paste: Make a paste of baking soda and water. Apply this paste to the cleaned terminals and let it sit for a few minutes to neutralize any remaining acid.
- Rinse and Dry: Rinse the terminals thoroughly with water and then dry them completely with a clean cloth. Apply a thin layer of dielectric grease to prevent future corrosion.
- Reconnect Batteries: Reconnect the positive (+) terminal first, then the negative (-) terminal.
Common Problems and Solutions
Several issues can arise with battery switches and their associated systems. Understanding these problems and their solutions can help you quickly resolve power issues on the road.
- Switch Fails to Operate: This could be due to a faulty switch, corroded connections, or a blown fuse. Check the fuses first, then inspect the connections for corrosion. If the problem persists, the switch may need replacing.
- Intermittent Power: Loose connections or corrosion can cause intermittent power. Clean the connections and tighten any loose bolts. If the problem continues, check the wiring for damage.
- No Power to Appliances: Check the battery switch to ensure it’s in the correct position. Check fuses and circuit breakers. Verify that the batteries are charged and functioning correctly.
Testing the Battery Switch with a Multimeter
A multimeter is a valuable tool for diagnosing electrical problems. You can use it to test the battery switch for proper functionality.
To test the switch, set your multimeter to measure DC voltage. With the switch in the “off” position, measure the voltage across the terminals. You should read near zero volts. Then, switch to the “on” position and measure the voltage again. You should read a voltage close to the battery voltage.
A significant difference or no voltage reading indicates a problem with the switch or its connections.
Proper voltage readings confirm a functional switch. Significant deviations may indicate a faulty switch, loose connection, or other electrical issue.
Battery Switch and Safety
Your travel trailer’s battery switch is more than just a convenient on/off switch; it’s a crucial safety component. Proper use and maintenance significantly reduce the risk of accidents and damage to your RV’s electrical system. Understanding its role in safety is paramount for a worry-free camping experience.Proper battery switch usage prevents accidental discharge, protecting your batteries from complete depletion and extending their lifespan.
A discharged battery can leave you stranded without power for lights, appliances, or even your refrigerator. Furthermore, a deeply discharged battery can be damaged beyond repair, necessitating a costly replacement.
Battery Terminal Corrosion Prevention
Corrosion on battery terminals is a common problem that can lead to poor electrical connections, reduced starting power, and even fire hazards. Regular cleaning and the application of a corrosion inhibitor are vital. To prevent corrosion, clean terminals with a wire brush, baking soda and water paste, or a commercial battery terminal cleaner. After cleaning, apply a dielectric grease to the terminals and connections to repel moisture and prevent future corrosion.
This simple maintenance task can save you significant headaches down the line.
Fire Hazards Associated with Improper Battery Handling
RV batteries contain flammable and corrosive materials. Improper handling, such as connecting the wrong terminals, creating sparks near flammable materials, or leaving exposed terminals, can easily lead to a fire. Always ensure proper ventilation around batteries to prevent the buildup of explosive hydrogen gas, a byproduct of battery operation. Never work on batteries while smoking or near open flames.
Additionally, make sure all connections are secure to avoid sparking. A simple spark near a spilled electrolyte solution can ignite a fire.
Safety Tips for Working with RV Batteries and Battery Switches
Before working with your RV batteries or battery switch, it’s crucial to understand the inherent risks and take appropriate precautions. Here are some key safety measures:
- Always disconnect the negative (-) terminal first when working on the battery system. This prevents accidental short circuits.
- Wear appropriate safety gear, including eye protection and gloves, when handling batteries or working near them.
- Ensure adequate ventilation when working with batteries to prevent the accumulation of flammable hydrogen gas.
- Never use open flames or sparks near batteries.
- Inspect battery terminals and connections regularly for corrosion and looseness. Clean and tighten as needed.
- Use a battery tender or trickle charger to maintain battery charge levels, especially during periods of inactivity.
- Store batteries in a cool, dry, and well-ventilated location.
- Familiarize yourself with the location of your RV’s fire extinguisher and how to use it.
- If you are unsure about any aspect of battery maintenance or switch operation, consult a qualified RV technician.
Mastering your travel trailer’s battery switch is key to a smooth and safe RVing experience. By understanding its function, performing regular maintenance, and following safety guidelines, you’ll ensure your electrical system operates efficiently and reliably for many adventures to come. Remember, proper battery management is not just about convenience; it’s about preventing costly repairs and ensuring your safety on the road.
Commonly Asked Questions
What happens if I leave my battery switch in the “off” position?
Leaving the switch off completely disconnects both house and chassis batteries, preventing any power from reaching your appliances or starting your vehicle.
How often should I clean my battery terminals?
Ideally, clean your battery terminals every three months or more frequently if you notice corrosion buildup.
My battery switch is making a clicking sound. What’s wrong?
A clicking sound often indicates a faulty switch or a low battery voltage. Check your battery voltage and consider replacing the switch if the problem persists.
Can I use a different type of battery switch in my travel trailer?
Replacing your battery switch requires careful consideration. Ensure the new switch is compatible with your existing electrical system’s amperage and voltage requirements. Consulting an RV technician is recommended.
